


You'd be forgiven for thinking we had conquered the war-torn battlefields of the far future last year in the Arena of Escalation, but as you may have heard, in the grim darkness of the far future, there is only war. Good thing for us, because that means there’s more hobbying, painting, and gaming to be done within the setting of Warhammer 40,000 by Games Workshop! While four of our contestants grabbed their best traveling cloaks and ancient maps to venture into the Age of Sigmar, the remaining eight contestants couldn’t get enough of the dystopian, crumbling facade of the Imperium and its myriad enemies.
Warhammer 40,000 truly offers a painter’s choice of armies to pick from, each with not only their own colour schemes but also their own textures, styles, and techniques that suit them best. Grabbing their collections of Warpaints Fanatic, Air, and Speedpaint, each of our contestants picked a unique army to paint up, from the shining golden paragons of the Custodes all the way to the leather and trinket-clad Kroot, ensuring a wide variety of miniatures.
It’s important to have a good idea of how you want to tackle the overall colour scheme for your army before getting 20 models in and realising you want to make a change. Painting up a test model or two lets you cement your colour palette, refine your technique, and, most importantly, give you a good idea of how much fun that scheme is to paint. While you may find something that looks great, if you didn’t have a good time painting it, you probably don’t want to do it 50 more times. These crucial minis may also lead to ideas or techniques you never would’ve thought of before painting them. It’s important to remember they’re just templates though, and you can certainly make changes as you paint more of your army. Without further ado, it’s time to prime the Geller Fields, plunge into the warp, and see what our Warhammer 40,000 contestants have brought to the table!


Steffen: The main thing I wanted was to try and nail down the gold. I knew I wanted to use Warpaints Fanatic Emperor Gold from the new John Blanche Masterclass set as the foundation for it.

I airbrushed this on over a basecoat of Warpaints Fanatic Rough Iron and shaded it with Speedpaint Purple Swarm and Hardened Leather. I then picked out the raised edges with Warpaints Fanatic True Brass. This turned out to be a very dark and sinister gold that I really liked, but it might still need some tweaking in the future before I’m completely happy with it.

Tim: I started into this Kroot Warshaper* knowing I wanted a bright teal skin and to primarily use our Speedpaint range for the entire Combat Patrol. Speedpaint Plasmatic Bolt seemed like a good fit for a vibrant alien skin. The other loud colours fell into place as I kept going. Speedpaint Nuclear Sunrise on the armour really turned out nicely, especially with the darker specs in it, adding a weathered feeling with no extra effort. Some of the initial run of this colour had this issue due to an unforeseen environmental factor, but we have since corrected it. If you experience this with your own Nuclear Sunrise, please reach out to contact@thearmypainter.com to have it corrected. For me though, on this Kroot, it was the perfect effect that I used to my advantage!

I started the quills with Speedpaint Purple Swarm, which I blended with the Noble Skin hide. I layered Warpaints Fanatic Matt White and Speedpaint Familiar Pink to brighten the quills and finished with Warpaints Fanatic Effects Power Node Glow. By this point, I had created a head-canon involving the Kroot absorbing the weird pink colour from whatever passes for water on this planet, and the basing worked itself out.
I can’t wait to dive into the Krootox next!
*A great test model, because he’s not in the Combat Patrol, but included in the army box set!

Ian: My chosen Hive Fleet is Tiamet, but as with all my colour schemes, I vary it slightly. The model is actually an older Termagant instead of one of the newer ones. I used older models to practice on since they are similar enough to the current models to work out the scheme, but they won’t use up the minis I need for my army in case I end up not liking it.

The armour on this one is painted Speedpaint Occultist Cloak, with Speedpaint Caribbean Ocean used for the body. Speedpaint Lizardfolk Cyan is used in the recesses to add more definition. The weapon is painted Speedpaint Familiar Pink to contrast with the main body, with Slaughter Red for the darker parts. I then used Warpaints Fanatic Matt White for the teeth and Resplendent Red for the eyes. The base is finished off with a mixture of Warpaints Fanatic Effects Dark Rust and Fresh Rust, the ever-popular studio method first developed by Thomas, with Matt Black for the rim.

Thomas: This is my test model for the T’au army I’m painting for this year’s Arena Challenge. I wanted to combine my favourite techniques and paint a gritty and dirty-looking T’au army, so I made good use of our Warpaints Air range for the first layers, including pre-shading.

Then, I airbrushed a bright green Speedpaint over the top to punch up the vibrancy. Last is the really fun part - the weathering! This was done using a mix of a sponge and rust washes.

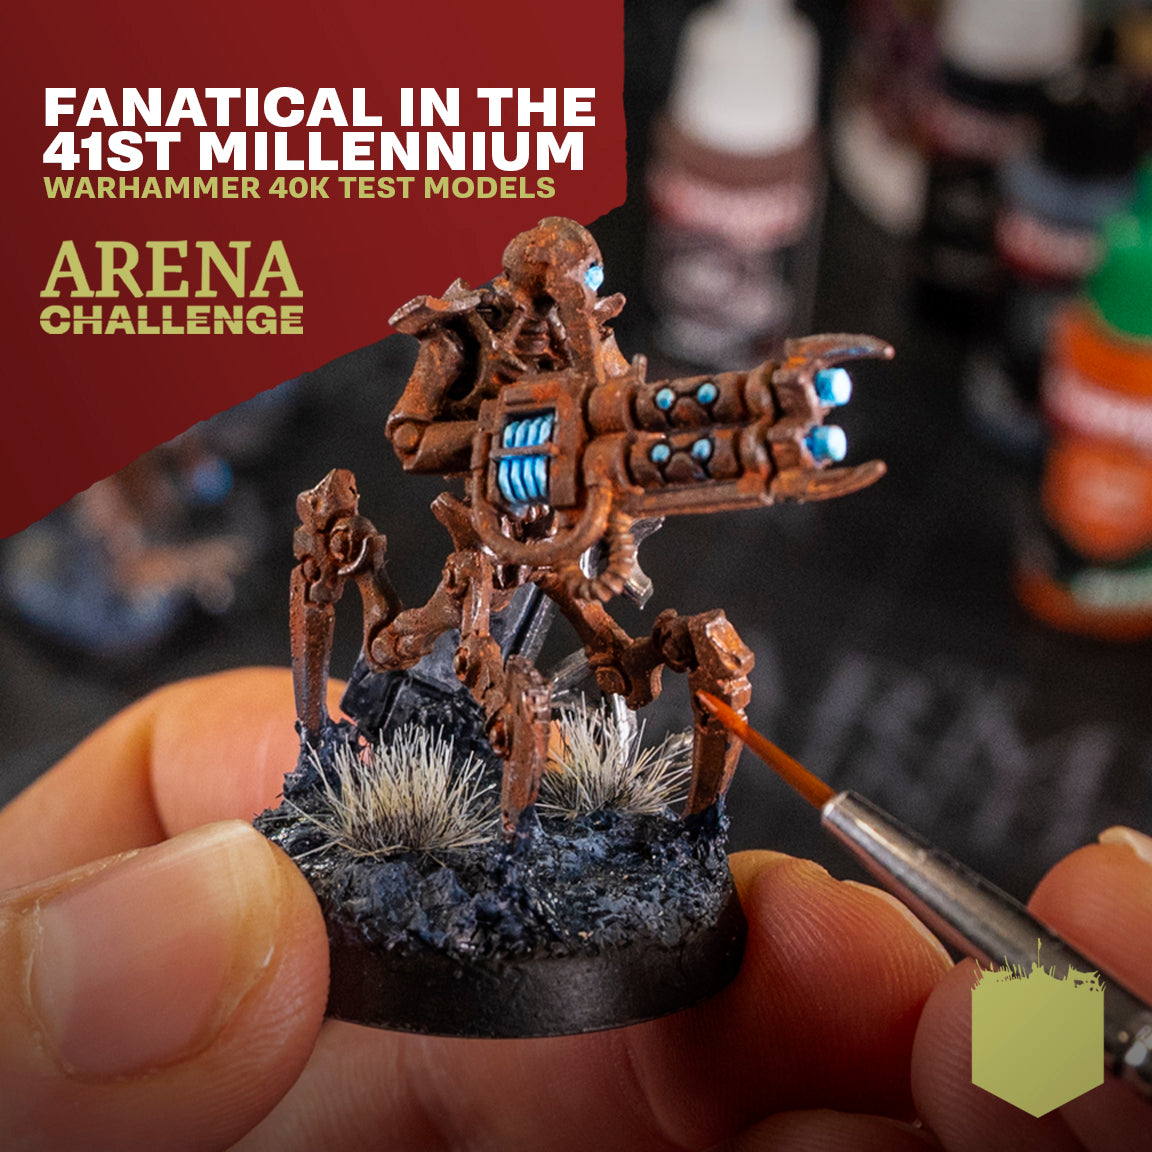
Lasse: The whole idea behind my Necrons is for me to practice for my upcoming Trench Crusade warbands, which, of course, means rust and mud – and LOTS of it! So, I went all out with both Warpaints Fanatic Effects Dark Rust and Fresh Rust and tried different combinations and techniques until I got to this look, which I really like.

You may also have noticed that I’ve done quite a bit of converting. I wanted my Necrons to look more like robots, so I made the rule that there could be no hands, no feet, and no humanoid faces! I also abused my credit card to get some Canoptek Wraiths and made the legs for my warriors from that kit.

Erasmus: I decided to go for the classic Order of our Martyred Lady paint scheme, which has the beautiful and timeless combination of black, red, and white. I knew I really wanted a black with depth and considered doing a NMM (non-metallic metal) technique for a while. Luckily, I was smart enough not to go that route and instead went for a drybrush and highlight approach over black with a grey highlight with blue undertones. To pull the color back towards black I utilized Speedpaint Grim Black through my Airbrush. By thinning it with Speedpaint Medium you can create a nice filter.

The red and white was easily done by taking full advantage of our Flexible Triad System. I really like the cool tones from the Cool Reds Flexible Triad.
To make the model pop, I chose a white marble base for a full contrasting effect.
As always, I look forward to seeing more models side by side and field a full force. Hopefully, it will be a sight worthy of the Holy Emperor himself!

Ulrik: With my test mini, I aimed to explore a combination of techniques like airbrushing, sponging, and edge highlighting. My goal was to create a visually striking yet manageable paint scheme. I designed the process specifically to be modular, making it easy to break down into smaller, satisfying steps. This approach allows for quick progress and a sense of accomplishment without the pressure of completing every step immediately.

For instance, sponging serves as an initial highlight that provides immediate impact, while edge highlighting can be added later to refine the finish. This structured yet flexible method keeps the painting process enjoyable and ensures my army remains accessible and exciting to revisit, allowing me to enhance and optimise the scheme even months or years after achieving tabletop readiness.

Bo: When I designed my Creations of Bile Chaos Space Marines, I wanted a striking and somewhat metallic look to the armour combined with the bluish-white mutated flesh of these once-Astartes.
I began by spraying the miniatures with Plate Mail Metal Colour Primer, followed by a “Quickshade” like wash of 2/5 Speedpaint Grim Black – 2/5 Speedpaint Medium, and 1/5 Warpaints Fanatic Wash Dark Tone & water mix. It is very, very fast and gives a fantastic basecoat of shaded metal. I followed this up with a light drybrush as all the Chaos details on the army pop out and make it a fast and effective way to spend time on the other colours.

For the red I use Speedpaint Murder Scene. This gives a deep and surprisingly precise basecoat for the Warpaints Fanatic Gemstone Red. When using this technique, there is minimal “going-back” to fix the colours, as you simply move the Speedpaint Murder Scene around the metal-highlighted trim and edges.
For the base, I used my regular Chaos base recipe, so that I can use them both with my Daemons and my existing Chaos Space Marines. Anything that can be allied should always have the same bases, so that you can mix and match any detachment Games Workshop throws out, with an army that still looks coherent.
Check back again soon for our first update on how our contestants are doing with their wider forces as they continue to build out their Combat Patrols and Spearheads.
Be sure to subscribe to our newsletter to stay abreast of all the latest updates and bookmark our Arena hub on the blog. You can also follow us on Facebook, Instagram, YouTube, BlueSky, Threads, and TikTok to see all the latest news and tutorials.
We encourage you to participate in the Arena Challenge at home by painting your own Combat Patrol or Spearhead with Warpaints Fanatic, Air, or Speedpaint. Be sure to tag your posts with #thearmypainter and #arenachallenge so we can follow along with your progress!

