The Army Painter Academy 101 – Paint Consistency

In the first instalment of Academy 101, Robert Karlsson, aka Rogland Studio, goes back to basics and shares his insights on paint, consistency, and brush movement. He not only demonstrates what he does, how he does it, but the whys and the theory behind his techniques. He’s gathered knowledge from across the worlds of miniature painting and fine art over the last 15 years, referencing sources such as books, videos, other painters, and of course, his own experience as a student and a teacher.
For Robert, painting begins with the technical aspects—things you need to understand and practise first.But he notes that having great technique does not automatically make you a great painter.
Robert: Be patient and view the theoretical sections as a complement to the hands-on practise of miniature painting.

Paints, Consistency, and Brush Movement
Even within the same paint range, different colours can behave very differently. This depends on the pigment: how strong it is, how transparent it is, and how many other colours are mixed into the formula. Some pigments are weaker in coverage, while others are very strong. For example, by adding white to a colour, we can often make it stronger in terms of opacity and coverage.
By using different “backgrounds”—or in the case of miniature painting, that is, different primer colours—your paints will behave very differently. Let’s take a closer look using three different paint-to-water dilutions and what they’re typically utilised for:
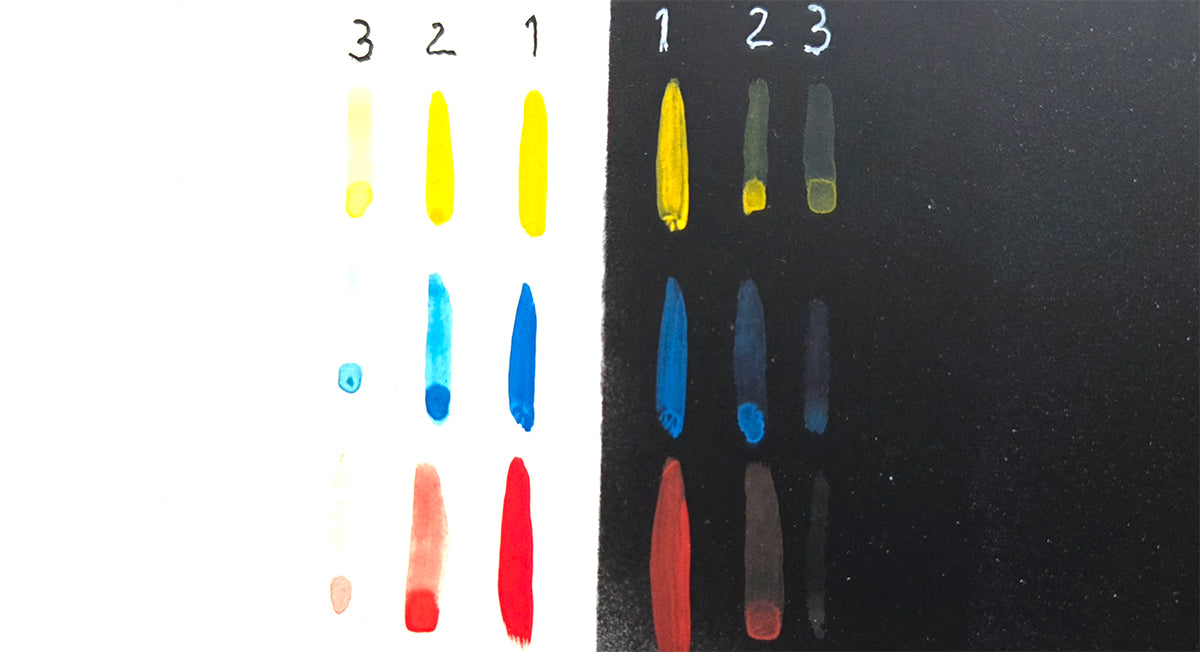
Dilution 1: Straight from the bottle, but applied with a slightly moist brush (Wet Blending)
Dilution 2: About 30–40% water added (Layering)
Dilution 3: About 60–70% water added (Glazing)
You can clearly see how each mixture behaves differently on both a black and a white background. You can also see how paint starts to pool and collect in examples 2 and 3.
This is important to understand and keep in mind while painting, because you generally don’t want those pools of accumulated paint on your miniature; they can dry unevenly and ruin surface detail.
This is one of the reasons why, in many cases, I use Dilution 1 as my main approach. I want to achieve an opaque surface as quickly as possible - especially in the early stages, when I’m basecoating. For beginners, be careful not to leave streak marks in your paint. We’re aiming for a smooth, even basecoat. This can happen when using thicker paint, especially if you’re not yet used to controlling it with your brush.
When we use layering or glazing, we must learn where to hide any paint pooling that might occur. Usually, we hide it in the shadows or darker areas of the miniature because that’s what those techniques are for. It’s useless to try to build light with glazing. You can manipulate light with glazes, but you don’t really create it that way.

Layering
Layering means building colour and light in steps using semi-opaque paint (see Dilution 2). You apply slightly thinned paint in controlled strokes, letting each layer dry before adding the next. Each layer is lighter or darker than the last.
- Builds highlights and volumes
- Creates smooth transitions in a controlled way
- Establishes light and shadow
Glazing
Glazing uses very thin, transparent paint (see Dilution 3). You apply a watery, pigment-light mix and let it tint what’s underneath. You don’t cover the surface, you filter it.
- Shifts colour temperature
- Smooths transitions
- Adds richness or depth
- Unifies tones
Wet Blending
Wet blending mixes colours directly on the miniature while the paint is still wet (see Dilution 1). You apply two (or more) colours next to each other and blend them together on the surface before they dry.
- Fast, organic transitions
- Strong light-to-dark blends
- Large surfaces (cloaks, skin, armour plates)